FREE SHIPPING ON ORDERS OVER $150

Cart
0
Your airbag light comes on after installing aftermarket seats because the factory occupant classification circuit no longer sees what it expects. Don’t guess at it and don’t unplug things randomly. Pull the SRS fault codes with a scan tool first. That code tells you exactly which circuit the airbag control module thinks is broken, and everything else in your fix depends on knowing that.
TL;DR:
- Most airbag warning lights after seat swaps are caused by the disconnected or damaged occupant classification sensor wiring, which the module uses to determine deployment.
- Proper diagnosis requires reading the specific diagnostic trouble codes with a capable scan tool to identify the exact circuit fault before attempting repairs.
- Common fixes include installing OEM-style connector adapters, repairing or replacing faulty wiring or sensors, rather than using unauthorized resistor tricks that can mask underlying issues.
- Reconnecting factory components and verifying wiring integrity before final assembly is crucial to prevent the fault recurring or compromising safety.
- DIY diagnosis and repair are feasible for simple wiring issues, but complex module or sensor faults often require professional intervention to ensure system integrity.
Table of Contents
- Why Aftermarket Seats Trip the Airbag Warning Light
- Quick Diagnostic Checks You Can Run Yourself
- Safe Fix Options and Why the Resistor Trick Is a Bad Idea
- A Step-by-Step Checklist for Diagnosing and Fixing the Fault
- When to Call In a Professional and What It Costs
- Underground Dynamics’ Fitment-First Approach to Seat Installs
- An Enthusiast’s Take: Modify Hard, but Don’t Skip the Diagnostics
- Get Your Seat Swap Right From the Start With Underground Dynamics
- Sources
- FAQ
Why Aftermarket Seats Trip the Airbag Warning Light
Every seat in your car is wired into the Supplemental Restraint System, not just the frame it’s bolted to. Swap the seat and you’re swapping into a network the factory tuned down to the pin count on the connector. The SRS light isn’t being dramatic. It’s telling you a circuit it monitors constantly just went quiet, open, or out of range.
The passenger seat carries the heaviest wiring load because of the occupant classification system (OCS). That’s the weight or pressure sensor mat built into the factory seat pan that tells the airbag module whether to deploy the passenger airbag, deploy it at reduced force, or suppress it entirely for a child seat or empty seat. Rip out the factory seat and that sensor goes with it. Unless your aftermarket seat replicates that circuit, the module has no data to read, and it flags a fault.
On the driver’s side and often the passenger’s, the seat also routes:
- Seatbelt pretensioner wiring, which fires the belt tight a fraction of a second before airbag deployment
- Seatbelt buckle switches, which tell the module whether the belt is latched
- Side airbag and seat position wiring, on cars where the side curtain or seat-mounted airbag connects through the seat base
- Clock spring or SRS harness continuity, which can get pinched or stretched during a swap even when it’s not seat-specific
Most aftermarket seats ship without a matching OEM-style connector for any of this. You’re left with a dangling factory plug, an aftermarket seat that has no idea it’s supposed to talk to the SRS module, and a control unit that stores a fault the instant it loses continuity. Sometimes the damage is simpler: a pin got bent or pushed back in the connector during install, or a wire got pinched under the seat rail when you torqued down the mounts.
Whatever the specific cause, the airbag control module responds the same way. It logs a diagnostic trouble code, lights the dash warning, and in most cases disables the airbag zone tied to that fault. That’s the part enthusiasts underestimate. A lit SRS light after a seat swap usually means one or more airbags, or the pretensioner on that side, won’t fire in a crash. Kia’s owner’s manual guidance is blunt about this: if the light stays on past the initial startup check, a component in the system likely isn’t functioning as intended, and the vehicle needs inspection before that’s treated as anything less than urgent.
Quick Diagnostic Checks You Can Run Yourself
Before you touch a wrench or a wire, run through a few low-risk checks. None of these require disassembling the airbag module, and all of them narrow down where the fault actually lives.
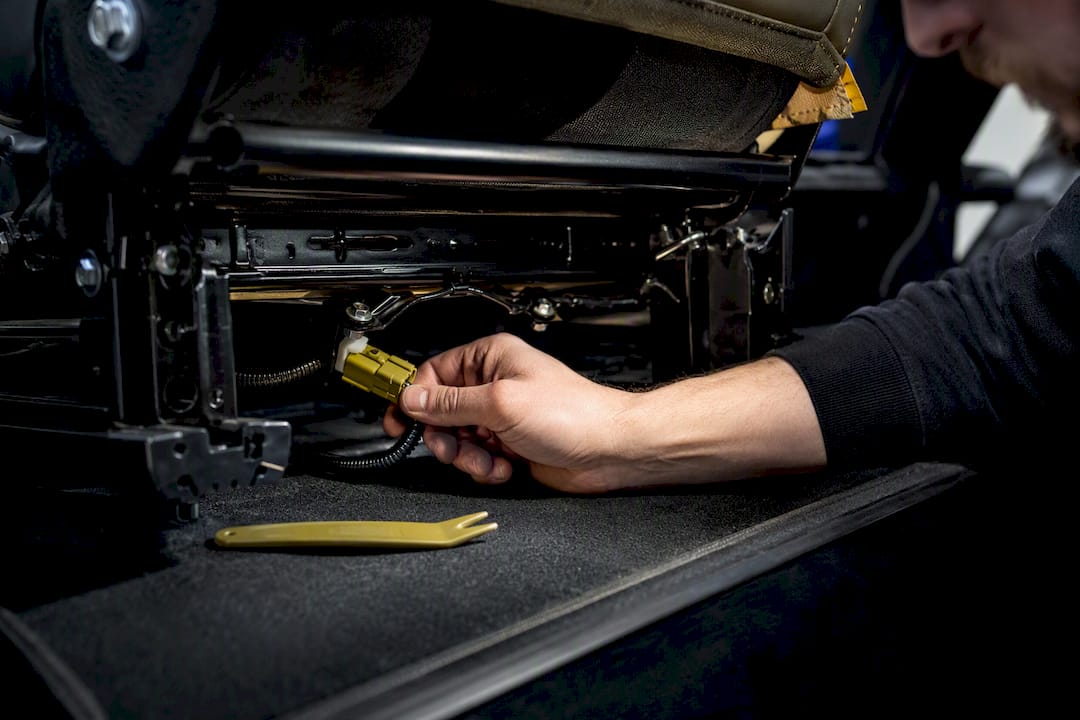
- Inspect the connector under the seat first. Slide the seat back, unbolt it if needed, and look at the factory harness connector that used to plug into the OEM seat. Check for bent pins, a connector that’s simply unplugged and zip-tied out of the way, or a plug that’s partially seated.
- Check for pinched or chafed wiring. Run your hand along the harness where it crosses the seat rail or mounting bracket. Aftermarket seat rails sit lower or at a different angle than stock, and that’s a common spot for a wire to get crushed during the final bolt-down.
- Test the seatbelt buckle switch manually. With the key on, buckle and unbuckle the seatbelt a few times and watch for a chime or dash indicator change. If the buckle switch circuit was disconnected during the swap, you’ll usually see no response at all.
- Pull the actual SRS code. This is the step that turns guesswork into a diagnosis. You have three practical paths: borrow a scan tool from a friend who has one capable of reading SRS/airbag codes (not just check-engine codes), use a local auto parts store’s scan service, or have a shop pull it. Note that most in-store scan services are built for check-engine diagnostics, and SRS-specific reads sometimes need a more capable tool than the free loaner at the counter.
Pro Tip: Write down the exact DTC, not just “the airbag light is on.” A code like B0051 or B0092 points to a specific circuit, and quoting that number to a shop on the phone can save you a diagnostic labor charge before you even walk in.
Skipping the code read and jumping straight to a fix is the single most common mistake in this process. Two completely different problems, a disconnected OCS sensor versus a chafed pretensioner wire, can produce the same dash light. Only the code tells you which one you’re actually dealing with.
Safe Fix Options and Why the Resistor Trick Is a Bad Idea
Once you have a code, you’re choosing between a handful of legitimate repair paths. All of them share one goal: restore the circuit the factory seat used to complete, rather than trick the module into thinking it’s still there.
- OEM-style connector adapters. Some aftermarket seat brands sell (or third parties make) pigtail adapters that let you retain the factory OCS and buckle switch wiring while bolting in a new seat shell. This is the cleanest fix when it’s available for your specific seat and chassis.
- Wiring repair or splice. If the fault code points to a damaged wire rather than a missing connector, a proper solder splice with adhesive-lined heat shrink, matched to factory gauge, restores the circuit without guesswork.
- Sensor or buckle replacement. A cracked OCS pad or a buckle switch with a broken internal contact needs a factory or factory-equivalent replacement part, not a workaround.
- Retaining the factory seatbelt and buckle assembly. Many aftermarket seat installs go smoother when the OEM belt and buckle stay in the car and only the seat shell changes, since that keeps the buckle sensor circuit untouched.
Here’s where a lot of DIY forums go sideways. The “resistor hack,” splicing a fixed-value resistor into the OCS harness to mimic the electrical resistance of an occupied factory seat sensor, shows up constantly in build threads as a five-minute fix. It’s not authorized by any manufacturer, and there’s no published data on how many resistor values actually work reliably. What it does, mechanically, is convinced the airbag module that a specific, unchanging weight class of occupant is always sitting in that seat. That’s the core problem: a real occupant classification sensor is dynamic. It adjusts deployment force, or suppresses the airbag entirely, based on who’s actually sitting there. A fixed resistor can’t do that. It locks the system into one assumption regardless of whether a 90-pound passenger or a 250-pound passenger is in the seat.
Community-sourced fixes like this are common online, but they’re not an authorized solution, and they can defeat the occupant-detection logic the factory engineered the system around. Beyond the deployment-force issue, a resistor also masks the original fault instead of fixing it. If a wire is actually chafed against the seat rail and slowly grounding out, splicing in a resistor upstream doesn’t stop that wire from eventually failing completely, possibly during a collision, when the system needs every circuit intact.

Clearing the code and calling it done is only safe once you know the underlying fault is actually repaired, not just silenced. A code that comes back after a drive cycle means you patched the symptom. If it stays clear through a full startup and driving cycle after a genuine wiring or connector repair, you’re in good shape. If it clears only because a resistor is feeding the module a fake signal, you’ve hidden a safety system fault instead of resolving one, which is the exact scenario manufacturer guidance warns against when it comes to unauthorized SRS modifications.
A Step-by-Step Checklist for Diagnosing and Fixing the Fault
Work through these in order. Each step gives you evidence the next step depends on, and skipping ahead is how people end up clearing a code twice for the same problem.
- Read and record every SRS DTC. Use a capable scan tool, a shop’s equipment, or a parts store’s diagnostic service, and write down every code, not just the first one that pops up.
- Inspect and photograph the harness. Pull the seat, photograph the connector, the wiring path along the rail, and any splice points before you touch anything. This documentation matters if you end up at a shop later and need to show what you’ve already ruled out.
- Temporarily reconnect the OEM seat if you still have it. Plugging the factory seat back in for a few minutes and watching whether the code clears is the fastest way to confirm the fault lives in the seat circuit rather than somewhere else in the SRS harness.
- Repair or replace the faulty component. Splice damaged wire, replace a cracked OCS sensor, swap a bad buckle switch, or install a verified adapter, following the standard troubleshooting flow of diagnose, identify, replace, and verify.
- Clear the code only after the repair, then complete a full verification drive. Start the car, confirm the SRS light does its normal three to seven-second startup flash and then turns off, drive it through a normal cycle, and check that the code hasn’t returned before you consider the job finished.
If the code returns after a genuine repair attempt, that’s your signal to stop diagnosing solo and get a second set of eyes, ideally with dealer-level SRS software, before you spend more time chasing it.
When to Call In a Professional and What It Costs
Some SRS faults are outside reasonable DIY territory, and there’s no shame in recognizing that early. Hand it to a shop or dealer when:
- The code points to the airbag control module itself rather than a sensor or wiring fault
- The OCS needs recalibration rather than a simple reconnect, which usually requires manufacturer-level software
- An airbag was deployed, damaged, or replaced as part of the seat swap
- You’ve done a wiring repair and the same code keeps returning
Dealer or specialty shop diagnostics typically start with a full SRS scan using factory-level tools, follow with targeted component testing, and finish with either a sensor replacement, a harness repair, or module reprogramming. Labor for straightforward wiring fixes often runs an hour or two; module replacement or OCS recalibration can run longer once you factor in programming time. Bring your saved DTCs and harness photos to the appointment. Handing a shop a specific code instead of “the airbag light’s on” typically means less diagnostic labor billed and a faster path to the actual fix.
Underground Dynamics’ Fitment-First Approach to Seat Installs
Most SRS faults after a seat swap trace back to fitment, not bad luck. Getting ahead of it starts before you ever pull the factory seat out.
- Verify harness compatibility before final bolts go in. Dry-fit the seat, check connector match, and confirm pin count before you torque anything down.
- Preserve OEM pigtails wherever possible. Cutting a factory connector off is a one-way decision. Keep it intact until you’ve confirmed you don’t need it.
- Use chassis-specific mounting hardware. Correct rail height and bracket geometry, referenced against a guide like our bucket seat sizing breakdown, keeps wiring away from pinch points and keeps seating position where sensors expect it.
- Follow a documented fitment checklist, not memory, especially on a car you’re only modifying once. Our chassis-specific fitment practices guide walks through the same connector and clearance checks a good installer runs every time.
An Enthusiast’s Take: Modify Hard, but Don’t Skip the Diagnostics
Build threads are full of clever seat swaps, and plenty of them work great. What gets glossed over is how many of those same builds are quietly driving around with a suppressed airbag zone because nobody pulled a code. Respect the SRS system the same way you’d respect brakes or steering. It’s the one part of your build you never want to find out was wrong after the fact.
Document your work, keep every connector you remove until you’re sure you don’t need it, and buy or borrow a scanner that actually reads SRS codes, not just check-engine codes. That’s the difference between a build that looks finished and one that actually is.
— Ismael
Get Your Seat Swap Right From the Start With Underground Dynamics
This kind of project benefits from chassis-specific fitment data instead of guesswork, so you know how a part actually sits on your car before it ships. That’s the real advantage over piecing a build together from generic listings and hoping the wiring lines up.
Browse our suspension and hardware category for mounting components that pair well with a seat swap, or check the full body kits and chassis parts catalog for the rest of your build. If you’re not sure whether a specific seat or bracket matches your chassis, reach out through our main site before you order, and get the fitment question answered before it becomes a wiring problem.
Sources
- Air bag warning light
- Airbag warning light: Why It Comes On & How to Fix It | FixMyCar
- How to Read Your Own Check Engine Light With Our Free Fix Finder Service - AutoZone
FAQ
What Does It Mean if the Passenger Seat Airbag Light Is On?
It usually means the occupant classification sensor in the passenger seat isn’t reading correctly, often because an aftermarket seat lacks the factory sensor pad or its connector was left unplugged during install. The module can’t determine occupant weight, so it flags a fault and may suppress that airbag until the circuit is repaired.
Is It Illegal to Drive With the SRS Light On?
There’s no universal law against driving with the light on, but it signals that a part of your airbag or pretensioner system may not deploy correctly in a crash, and manufacturer guidance treats a persistent SRS light as something that needs inspection, not something to ignore. Check your state’s inspection requirements separately, since some do fail a vehicle for an active SRS fault.
Can AutoZone Reset an Airbag Light?
Auto parts stores like AutoZone commonly offer free scan services for check-engine codes, but SRS-specific code reads and resets often require a more advanced tool than what’s available at the counter. Call ahead to confirm whether their loaner tool actually reads airbag/SRS modules before making a trip.
How Do You Make the Airbag Light Go Away for Good?
Read the SRS code, repair the actual fault it points to (a wiring issue, a missing connector, or a bad sensor), then clear the code and complete a full drive cycle to confirm it doesn’t return. Clearing the code without fixing the underlying wiring or connector issue, or masking it with a resistor, only hides the problem instead of solving it.