FREE SHIPPING ON ORDERS OVER $150

Cart
0
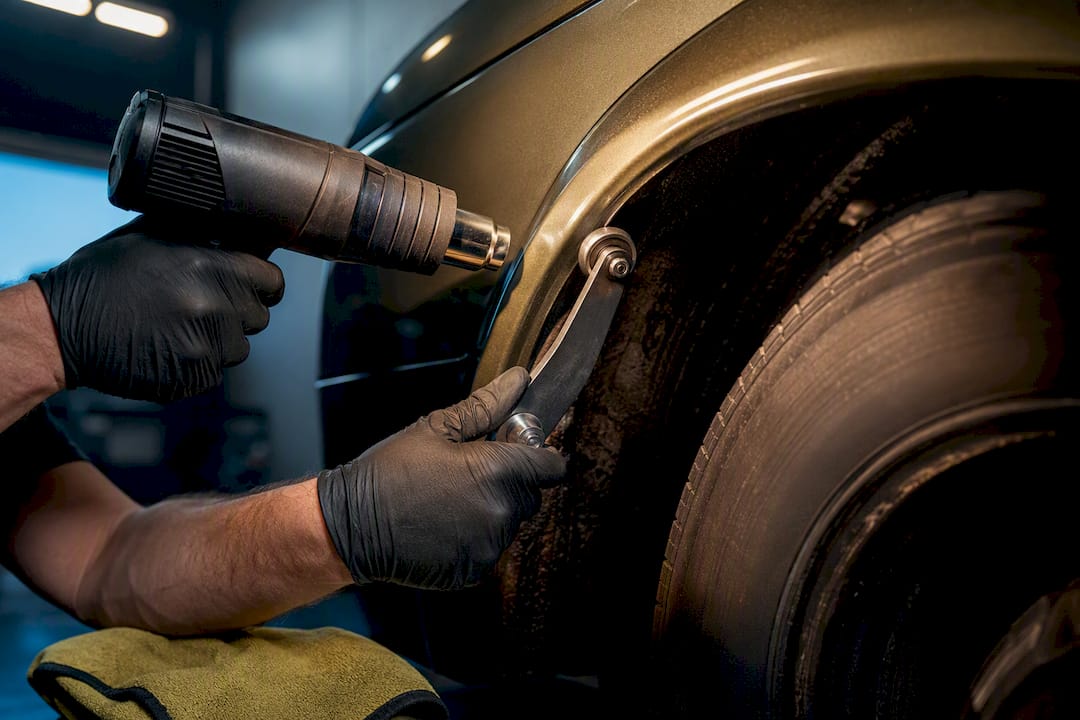
Fender rolling re-forms the inner fender lip to gain roughly 5 to 15mm of clearance and stop tire rub, all while keeping the exterior line stock-looking. It’s a DIY-friendly job if you have a roller tool, a heat gun, and patience for slow, repeated passes. If your paint matters to you, or the panel turns out to be fiberglass or already patched with filler, hand it to a shop instead.
TL;DR:
- Fender rolling increases clearance by 5 to 15mm, allowing wider wheels and lower stance without altering the exterior lines.
- The process is safest on steel panels, and rubber or nylon rollers paired with proper heat are essential to avoid paint cracks or panel damage.
- Proper diagnosis is critical; fender rolling won’t fix issues caused by ride height, offset, or excessively wide tires.
- DIY rolling takes about 1 to 1.5 hours per axle if done patiently with gradual passes, but rushing or improper heating often causes damage.
- Buying a shop service typically costs $50 to $70 per fender, but a careful DIY job is viable for those willing to invest time and attention to detail.
Table of Contents
- What Is Fender Rolling, and When Should You Use It?
- What Tools Do You Need Before You Start Rolling Fenders?
- How Do You Actually Roll a Fender Step by Step?
- Can You Roll Fenders Without a Roller Tool?
- Should You DIY Fender Rolling or Hire a Pro?
- What Goes Wrong When Fender Rolling, and How Do You Avoid It?
- How Underground Dynamics Approaches Fitment Before You Ever Pick Up a Roller
- The Real Skill in Fender Rolling Isn’t the Roller, It’s the Diagnosis
- Shop the Parts That Make Fitment Work Easier
- Sources
- FAQ
What Is Fender Rolling, and When Should You Use It?
Fender rolling is the process of massaging the fender’s inner lip flat, or slightly outward, using heat and steady mechanical pressure. You’re not stretching metal or changing the exterior contour. You’re just uncurling the factory lip that was rolled inward at the factory for tire clearance and NVH control, buying back the room your wider wheels or lower stance just ate up.
You’ll know rolling is the right call when you see specific signs:
- Fresh rubber shavings or a worn “witness mark” on the inner lip after a drive
- Tire contact only under compression (hitting a dip or turning hard)
- A planned poke or stretch that’s modest, not extreme
Rolling won’t save you if the fender has a double-walled pinch weld (common on rear arches), if the panel is fiberglass instead of steel, or if you need serious width beyond what a factory lip allows. In those cases, you’re looking at different tools entirely.
Here’s how the three main techniques stack up:
- Rolling: Least invasive. Flattens the existing lip with heat and pressure. No cutting, no paint loss if done right.
- Pulling: More aggressive. Physically bends the fender’s arch outward for extra flare, often needs paint touch-up.
- Cutting: Most invasive. Trims material for major width gains, almost always requires bodywork and paint afterward.
What Tools Do You Need Before You Start Rolling Fenders?
You don’t need a full shop to do this right, but skipping the checklist is how people crack paint or hit metal that isn’t steel. Gather your gear first.
Essential kit:
- Fender rolling tool (hub-mounted roller is the standard choice)
- Heat gun (a wide-nozzle model heats more evenly than a narrow one)
- Jack and jack stands
- Lug wrench and a torque wrench for reassembly
- Washers to space the roller correctly on your hub
- Nylon or hard rubber roller wheel (avoid metal-on-metal contact)
Nice to have: an infrared thermometer for surface readings, a rubber mallet for stubborn spots, and aluminum foil or a heat shield to protect nearby trim and wiring.
Before you touch the roller, run a magnet over the fender lip. If it grabs, you’ve got steel and you’re clear to roll. If it doesn’t, you’re dealing with fiberglass, plastic, or a filled repair panel, and rolling will crack it rather than reshape it. Check for prior bodywork too. A thick layer of filler behaves nothing like bare sheet metal under heat.
Once you’ve confirmed steel, pull the wheel, remove the inner fender liner if one’s present, chock the opposite wheels, and put on gloves and eye protection. Heat guns and spinning rollers near painted panels punish carelessness fast.
Pro Tip: Peel back any factory sound-deadening or undercoating near the lip before you start. It insulates the metal from your heat gun and can hide how hot the panel’s actually getting.
How Do You Actually Roll a Fender Step by Step?
This is the part where patience pays off and rushing costs you paint. The whole job runs about 1 to 1.5 hours per axle for someone doing it carefully, closer to two hours if you’re being extra cautious on a car you actually care about.
-
Lift and secure the car. Jack the vehicle, set it on stands, chock the wheels that stay on the ground, and remove the wheel on the corner you’re working.
-
Mount the roller. Thread the tool onto your wheel studs, using washers to set the arm at the right height and angle so the nylon roller wheel contacts the inner lip directly, not the outer body line.
-
Heat the panel. Working in a sweeping motion, warm a small section of the lip at a time, keeping the gun moving so you don’t scorch one spot. You’re aiming for a surface that’s warm to the touch, somewhere around 120 to 150°F rather than hot enough to blister. An infrared thermometer takes the guesswork out if you have one.
-
Roll in light passes. Pull the roller arm through the lip in short, repeated strokes rather than one heavy shove. Practitioner demonstrations consistently show slow, multi-pass rolling with a hub-mounted tool, checking the panel between passes rather than committing to one aggressive bend.
-
Reheat as needed. Metal cools fast, especially outdoors. If a section stops moving easily, stop and warm it again before continuing. Cold paint is brittle paint.
-
Progress around the arch. Work in small overlapping sections, moving the roller a few inches at a time so the whole lip gets even attention instead of one over-rolled spot next to an untouched one.
-
Test-fit periodically. Every few passes, remount the wheel (or hold it up to the arch) and check clearance against your tire. This tells you when to stop instead of guessing.
-
Clean and protect exposed metal. Rolling can crack undercoating or expose bare edges. Wipe the area down and apply a rust-inhibiting spray or seam sealer touch-up before buttoning things back up.
-
Let the panel cool fully before you remount the wheel and torque the lug nuts to spec.
-
Test drive and recheck. Drive it over the same bumps or turns that used to cause rubbing, then inspect the lip again for fresh contact marks.
Quick fact: a properly rolled fender typically frees up 5 to 15mm of clearance, which is often the exact margin between constant rubbing and a clean fit.
Can You Roll Fenders Without a Roller Tool?
Plenty of builders have rolled a fender with a baseball bat, a length of pipe, or a hammer and a wood block instead of a dedicated tool. The bat method works by wedging the bat against the inner lip and levering it with body weight, moving section by section. The hammer method taps the heated lip flat directly, usually with a wood or rubber buffer between the hammer and the paint.
Both work in a pinch, but they trade consistency for cost. A roller tool distributes pressure evenly across a controlled arc, which is part of why it produces more repeatable results than an improvised lever or a hammer swing. Freehand tools are much easier to overdo in one spot, which is exactly how you end up with a crease instead of a smooth curve.
These methods make more sense on a project car headed for a repaint anyway than on a daily driver with paint you want to keep. If you go this route:
- Use more heat than you think you need, and keep the panel warm through the whole process
- Cushion every point of contact with a wood block or thick rubber pad, never bare metal
- Move in small increments and check your progress constantly instead of committing to one big push
- Accept that some cosmetic imperfection is the tradeoff for the lower cost
Should You DIY Fender Rolling or Hire a Pro?
A shop roll typically runs about $50 to $70 per fender for a straightforward job, with pulling or cutting costing meaningfully more once paint and bodywork enter the picture. Most shops can knock out an axle in under an hour thanks to dedicated equipment and repetition.
The case for paying someone else comes down to risk tolerance:
- Shops use calibrated heat control and know how long steel needs to sit before it moves cleanly
- They’ve seen the double-walled pinch welds and filler jobs that trip up first-timers, and they’ll catch them before damage happens
- If something does crack, a shop can usually blend paint on the spot instead of leaving you with a visible repair
If your car is a beater or a dedicated project build, DIY rolling saves money and teaches you the panel. If it’s a clean daily driver with paint you’d hate to touch up, the $50 to $70 per fender is cheap insurance.
What Goes Wrong When Fender Rolling, and How Do You Avoid It?
Most failures trace back to the same handful of causes: overheating one spot instead of heating evenly, working a panel that turns out to be filler or fiberglass, or trying to finish the job in one aggressive pass instead of many light ones. Impatience, skipping the heating step or muscling through in a single pass, is the most common mistake among first-time DIYers, and it’s almost always the reason a paint job ends in a crack instead of a clean curve.
Watch for these warning signs and stop the moment you see them:
- Paint blistering, bubbling, or turning glossy under heat
- Any crackling sound as the roller passes
- A visible crease forming instead of a smooth curve
If damage does happen, don’t panic and don’t keep pushing. Hit any bare metal with a rust inhibitor immediately to prevent corrosion from starting under the clear coat. Minor cracking can often be handled with a small touch-up and clear coat blend. A creased or torn panel usually means a trip to a body shop, and in rare cases, a replacement fender is cheaper than trying to save a badly bent one.
Pro Tip: Keep a spray bottle of water nearby. If a spot gets hotter than you meant, a light mist cools it fast without shocking the metal the way a full soak would.
How Underground Dynamics Approaches Fitment Before You Ever Pick Up a Roller
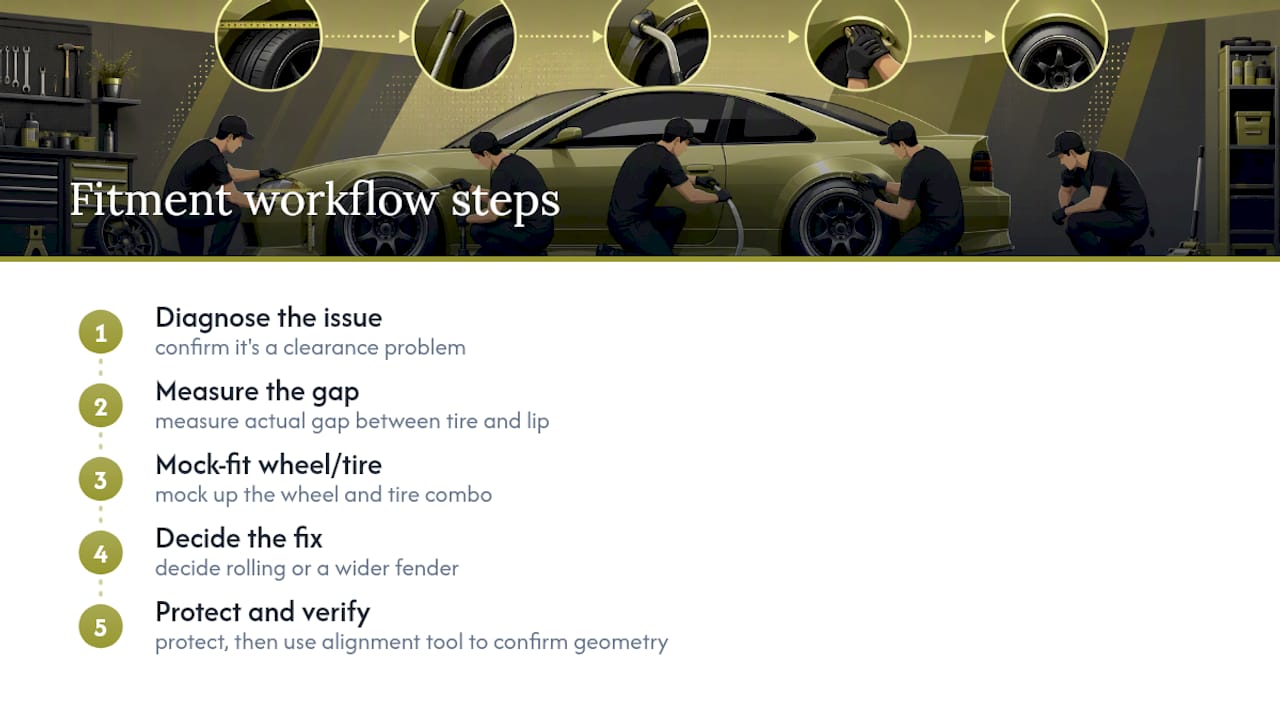
Rolling only fixes a clearance problem you’ve already diagnosed correctly. That’s why chassis-specific fitment data matters more than most guides admit. Measure the actual gap between tire and lip before you touch a heat gun, mock up the wheel and tire combo you’re planning to run, and only then decide whether rolling solves it or whether you need a wider fender altogether.
That sequence, measure, mock-fit, decide, protect, is the backbone of the Widebody Fender Fitment Workflow, which walks through how to confirm clearance numbers before committing to any bodywork. It’s worth reading before you buy a roller tool, because plenty of “rubbing” issues turn out to be a ride height problem rather than a lip problem.
If you’re chasing precise alignment specs after rolling, an alignment tool built for your chassis helps confirm your geometry didn’t shift during the process. Have specific fitment questions on your build? That’s exactly what proprietary fitment notes are for.
The Real Skill in Fender Rolling Isn’t the Roller, It’s the Diagnosis
Most guides treat fender rolling like a mechanical checklist: heat it, roll it, done. The bigger skill is knowing whether rolling is even the right fix in the first place. A lot of rubbing complaints aren’t lip clearance problems at all. They’re ride height problems, offset problems, or a tire that’s simply too wide for the chassis no matter how flat you get that inner lip.
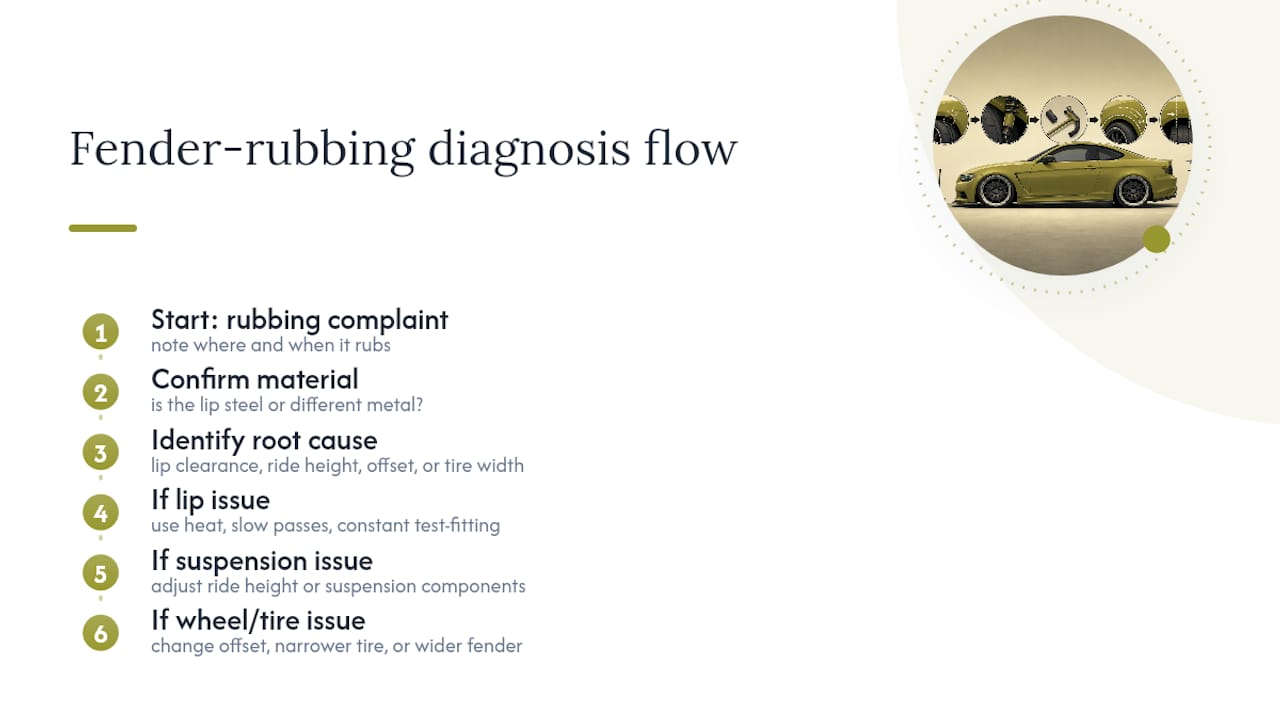
Conventional advice also underplays how much patience matters versus tool quality. A $40 roller used correctly, slow passes, real heat, constant test-fitting, beats a premium tool rushed through in twenty minutes. The failures we see traced back to impatience aren’t tool failures. They’re technique failures.
If you take one thing from this, prioritize the diagnosis before the technique. Confirm you’re dealing with steel, confirm the rubbing is a lip issue and not a suspension issue, and only then reach for the heat gun. Rolling is genuinely one of the lowest-risk ways to gain clearance when it’s the right fix. It’s a wasted afternoon, or worse, when it isn’t.
— Ismael
Shop the Parts That Make Fitment Work Easier
Once you’ve rolled your fenders and confirmed clearance, the next fitment variable is usually ride height, and that’s where a lot of builders get stuck buying trial-and-error parts instead of ones matched to their chassis. Underground Dynamics stocks coilovers, air suspension, and lowering springs with the fitment specs listed up front, so you’re not guessing whether a kit clears your newly rolled lip before you order it.
If your rolling job reveals that you actually need more room than a lip roll can provide, the catalog also covers wide-body fenders and body kits built for popular enthusiast platforms, in carbon fiber or fiberglass with real fitment data attached rather than vague size charts. Browse the full parts catalog to compare options by chassis, or reach out with your specific wheel and tire combo if you want a second opinion before you buy.
Sources
For deeper technical reference beyond this guide, check the WheelPrice fender rolling breakdown for clearance math, the Pure Diesel Power instruction set for tool mounting, and the MotorWeek demo alongside the cyPaint heat guide for safe temperature practice.
- Fender Rolling & Modification Guide: Making Aggressive Fitment Work
- MotorWeek: Fender rolling demo and discussion
- How to roll fenders without cracking paint
FAQ
What Is the Point of Fender Rolling?
Fender rolling flattens the inner fender lip to gain clearance for wider wheels or a lower stance, typically freeing up 5 to 15mm of room without cutting the panel or changing its exterior look.
How Much Does It Cost to Have Your Fenders Rolled?
A professional roll usually costs about $50 to $70 per fender, while pulling or cutting runs higher once paint and bodywork get involved.
What Can You Roll Your Fenders With?
A hub-mounted fender roller paired with a heat gun is the standard setup, though some builders use a baseball bat, pipe, or hammer with a cushioned block as a lower-cost, higher-risk alternative.
How Hard Is Fender Rolling?
It’s approachable for a patient DIYer. A careful job takes about 1 to 1.5 hours per axle, and most failures come from rushing the heat or skipping the magnet check on the panel, not from the technique itself being difficult.