FREE SHIPPING ON ORDERS OVER $150

Cart
0
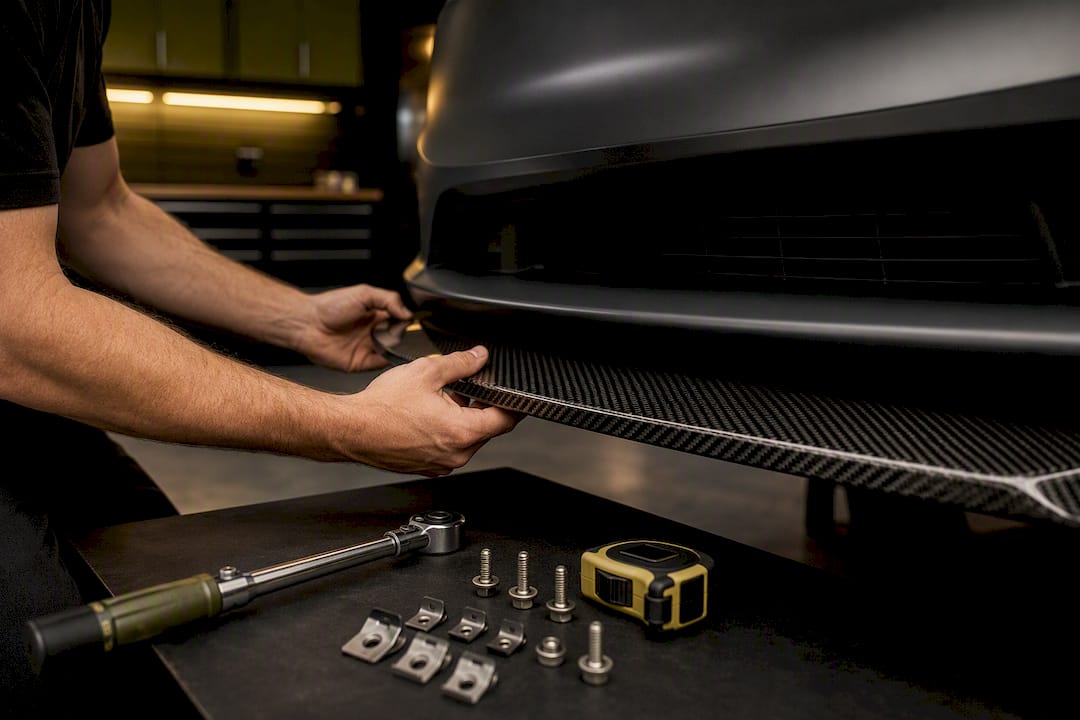
For a durable, roadworthy front lip installation, use mechanical fasteners, either drilling with shoulder bolts and U-nuts or rivnuts, and treat adhesive as a supplement, not the foundation. Tape-only mounts belong on show cars, not daily drivers or track builds. Always test-fit and center the lip before you touch a drill, and grab a second set of hands. If you want a setup that holds up like factory hardware, go with OEM-style shoulder bolts and U-nuts or properly backed rivnuts, torqued to spec.
TL;DR:
- Mechanical fasteners like shoulder bolts and rivnuts provide the long-term durability needed to withstand road vibration and curb impacts, unlike tape-only mounts.
- Proper installation requires thorough pre-fit testing, alignment, and clearance checks to avoid damaging sensors or hardware during drilling or trimming.
- Over-tightening threaded fasteners can crack or strip the bumper material, so torque should be carefully followed within specified ranges.
- Universal lip kits demand precise template-based trimming and clearance verification around suspension and sensor areas to prevent fitment issues.
- Chassis-specific, direct-fit front lips significantly reduce unexpected problems by accounting for factory hardware locations and sensor placement.
Table of Contents
- How Do You Install a Front Lip the Right Way?
- Tools, Materials, and Parts Checklist for a Front Lip Install
- Preparing to Install: Centering, Alignment, and Safety Checks
- Drilling and Fasteners vs. Adhesive vs. Clips: Which Mounting Method Wins?
- Step-by-Step Front Lip Installation Workflow
- Trimming and Clearance Checks for Universal Lip Kits
- Common Installation Problems and How to Fix Them
- Front Lip Maintenance and Inspection Schedule
- How Underground Dynamics Approaches Fitment
- What This Guide Actually Recommends
- Sources
- FAQ
How Do You Install a Front Lip the Right Way?
Every reliable front lip installation follows the same bones: test-fit, center, mark, drill or rivnut, fasten, seal, and recheck after a short drive. Skip a step and you’ll find out on the highway, usually when a corner of your lip starts fluttering at 60 mph.
The reason mechanical fasteners matter so much comes down to physics. A front lip takes a beating from road vibration, curb scrapes, and aerodynamic load at speed, and most performance-oriented lips in fiberglass or carbon fiber need real hardware to survive that abuse. Tape alone can hold a lightweight universal lip in place at a car show, but it wasn’t built for sustained flex and vibration over thousands of miles.
There’s also a terminology gap worth clearing up early. Some people call this a “lip kit install,” others say “front bumper lip installation,” and plenty just call it “splitter installation.” They’re all describing the same job: attaching an aero piece to the lower edge of your front bumper, whether that’s a bolt-on chassis-specific kit or a universal lip kit you’re trimming yourself. This guide covers both, with material-specific advice throughout because carbon fiber, fiberglass, and ABS urethane all behave differently under a drill bit.
Tools, Materials, and Parts Checklist for a Front Lip Install
Gathering everything before you start saves you from stopping mid-install with grease-covered hands, hunting for a missing drill bit.
Safety and support gear:
- Jackstands rated for your vehicle’s weight (never rely on a jack alone)
- Wheel chocks and gloves
- A second person for lifting and alignment
Tools:
- Drill with a graduated bit set (1/8" to 3/8" typically covers most hardware)
- Rivet gun (for rivnuts or pop rivets)
- Torque wrench
- Clamps and masking tape for positioning
- Countersink bit for flush fastener heads
Consumables and adhesives:
- 3M VHB tape or butyl tape for supplemental bonding
- Silicone sealant for seam protection
- Isopropyl alcohol for surface prep
- Automotive weatherstripping for gap filling
Hardware:
- Stainless shoulder bolts and U-nuts for OEM-style mounting
- Rivnuts for plastic or thin composite bumpers where you can’t access the backside
- Washers, locknuts, and backing plates
Shoulder bolts paired with U-nuts spread clamping force across a wider surface than a standard bolt and nut, which is exactly why they reduce U-nut pullout on chassis that see repeated curb strikes or flex. That single detail is why hardware kits built around this design hold up longer than generic bolt kits.
Pro Tip: Buy a few extra rivnuts before you start. If you strip one on your first attempt, you don’t want to be mid-install and stuck ordering parts.
Preparing to Install: Centering, Alignment, and Safety Checks
Get your vehicle secured before anything else touches the bumper. Two jackstands, a level surface, and wheels chocked are non-negotiable if you’re pulling a wheel or working underneath the front end. Working alone under a car balanced on a floor jack is how people get hurt, and it’s also how lips get misaligned because you’re rushing.
Here’s the sequence that keeps a front lip installation from going sideways:
- Remove or loosen the bumper if your lip design requires backside access; for bolt-on direct-fit kits, you can often install on-car.
- Dry-fit the lip without any fasteners to check overall alignment against the bumper’s lower edge.
- Measure from fixed reference points, like fog light openings or tow hook covers, to confirm the lip sits centered left to right.
- Tape the lip in place using 3M tape as a temporary positioning aid, then step back and eyeball it from multiple angles.
- Clamp it down once you’re confident in the position, and mark your pilot hole locations through the lip’s existing holes or your template.
- Check clearance at full steering lock and simulate suspension compression by hand or with a floor jack under the control arm.
That clearance check in step six matters more than most guides admit. Sensor housings, parking sensors, and washer nozzles hide in places you won’t notice until you’ve drilled through one. Direct-fit, chassis-specific lips sidestep most of this risk because the mounting points are engineered around your bumper’s factory hardware, which is a big part of why Underground Dynamics leans toward chassis-specific kits over generic universal pieces.
Drilling and Fasteners vs. Adhesive vs. Clips: Which Mounting Method Wins?
The mounting method you choose determines whether your lip survives a season of driving or ends up as a cracked mess in your garage. Here’s how the three main approaches stack up.
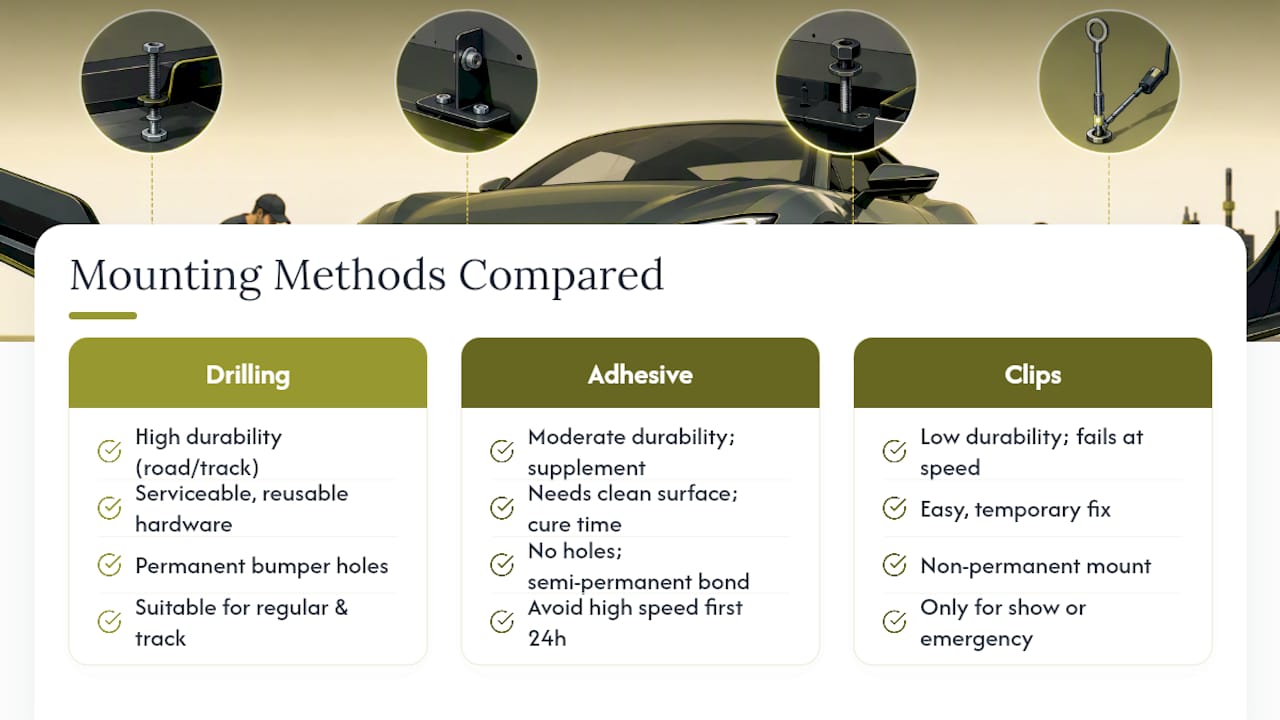
Drilling with bolts or rivnuts is the baseline for anyone driving the car regularly or tracking it. You get repeatable torque specs, a mount that won’t loosen from heat cycling, and hardware you can service later. The downside is permanent holes in your bumper, and you need backing (a nut plate, U-nut, or rivnut) since most fiberglass and ABS bumpers don’t have enough material for a bolt to bite into on its own.
Adhesive-first options, like 3M VHB tape, butyl tape, and silicone, work well as a supplement to mechanical fasteners rather than a replacement for them. VHB tape can handle real shear load once fully cured, but it needs clean, alcohol-wiped surfaces and time. Vendor installation guides commonly recommend avoiding high-speed driving for the first 24 hours after an adhesive install to let the bond set. Cold weather slows cure time further, so a lip installed in a 40-degree garage needs more patience than one installed in July.
Clips and zip-ties are the quick-fix category. They’re fine for a temporary show setup or getting you home after a lip shifts, but they’re not a long-term solution. The failure mode here is predictable: highway speeds create enough airflow and vibration that a zip-tie-mounted corner starts fluttering, then tears loose entirely. If you’ve ever seen a lip dragging behind a car on the interstate, there’s a good chance clips or tape were doing the job bolts should have done.
Most performance-oriented fiberglass and carbon fiber lips need mechanical fasteners to survive road vibration and downforce at speed, since tape-only mounts generally can’t handle that combination over time. Community discussions on drilling versus gluing consistently land on the same conclusion: drill for anything you plan to keep, glue only as a supplement or a stopgap.
Step-by-Step Front Lip Installation Workflow
Once you’ve settled on hardware and confirmed clearance, the actual install moves fast if you work in order.
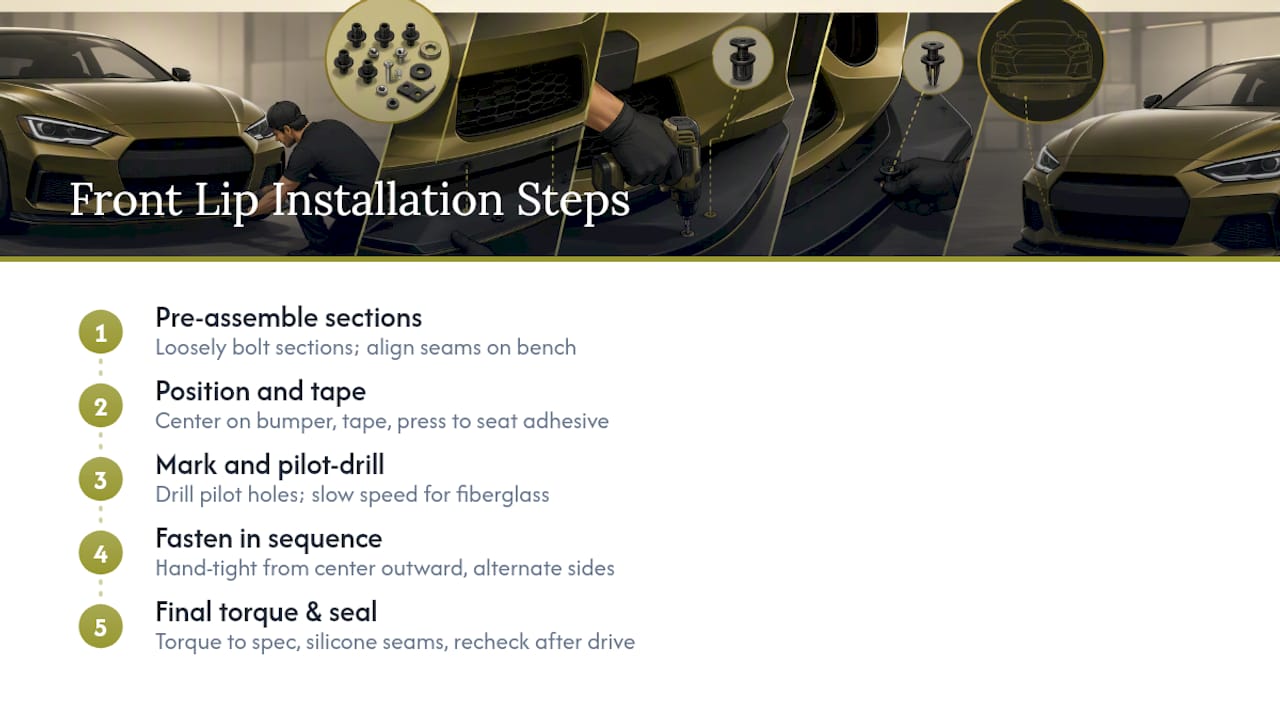
1. Pre-assemble multi-piece lips. Many kits ship in two or three sections. Bolt these together loosely on a workbench first, checking that seams line up flush before you ever bring the piece to the car.
2. Position and re-tape. Bring the lip to the bumper, tape it in the centered position you confirmed during test-fitting, and press firmly along every taped section to seat the adhesive backing.
3. Mark and pilot-drill. Working through the lip’s factory holes or your template marks, drill pilot holes slightly smaller than your fastener diameter. For fiberglass, use a slower drill speed and back the bit with tape to prevent gel coat chipping. For ABS or urethane, standard speed works fine, but deburr the holes afterward. If you’re using rivnuts on a plastic bumper cover, drill to the rivnut’s specified hole size exactly. A common spacing pattern runs fasteners every 6 to 8 inches along the lip’s length, tighter near corners where flex is highest.
4. Fasten in sequence, hand-tight first. Start from the center and work outward in both directions, alternating sides, so the lip pulls evenly against the bumper instead of bowing at one end.
5. Torque to final spec. Stainless shoulder bolts through U-nuts typically run in the 4 to 6 ft-lb range for plastic bumper substrates, don’t crank them like a wheel bolt. Rivnuts get set with the rivet gun until the mandrel snaps, then the bolt itself gets hand-tight plus a quarter turn. Overtightening on plastic will strip the threads or crack the surrounding material faster than any pothole will.
6. Seal the seams. Run a thin bead of silicone sealant along any gap between the lip and bumper where water could pool, especially at the corners.
7. Recheck after the first short drive. Take it around the block, then retorque everything. Vibration during that first drive settles the hardware.
Pro Tip: Keep the torque wrench set light and check twice. It’s a lot easier to add a quarter turn than to drill out a stripped hole in a $400 carbon fiber lip.
Trimming and Clearance Checks for Universal Lip Kits
Universal lips demand more prep work than direct-fit pieces, since you’re the one deciding where material gets removed.
Start with a cardboard template. Trace your bumper’s lower contour, cut the template, and hold it up against the lip to mark cut lines before touching the actual part. This step alone prevents the single most common universal-lip mistake: cutting too much off one side because you eyeballed it instead of measuring twice.
When you cut fiberglass, score the line first with a utility knife, then use a fine-tooth blade to avoid stress cracks radiating from a rough cut edge. ABS and urethane trim cleaner with a rotary tool and a sanding drum to smooth the edge afterward.
Clearance checks matter just as much as the cut itself:
- Turn the steering to full lock in both directions and check for contact between the lip and tire sidewall.
- Compress the suspension by hand or with a jack under the control arm to simulate bottoming out, and mark your worst-case clearance margin with tape.
- Identify every parking sensor, radar module, and camera housing in the bumper before you drill or cut anywhere near them.
- If a sensor sits directly in your intended fastener path, relocate the hole or choose a different mounting point rather than cutting a hole through the sensor housing.
Modern ADAS-equipped vehicles complicate universal fitment because radar sensors often sit low in the bumper, exactly where lip hardware wants to go. When in doubt, a chassis-specific fitment guide for your platform will show you where those sensor zones actually sit.
Common Installation Problems and How to Fix Them
Most front lip failures trace back to one of three causes: stripped hardware, cracked material, or failed adhesive.
- Stripped mounting points usually mean the original hole was drilled too large or overtightened. Install a rivet nut in the stripped hole for a fresh thread, or add a backing plate behind thin bumper material to spread the load.
- Cracked fiberglass around a fastener point can often be repaired with an epoxy and fiberglass cloth patch on the backside, sanded smooth once cured. If the crack runs through a structural mounting flange, replacement is safer than a patch that might fail again under load.
- Peeling adhesive almost always comes from insufficient surface prep. Strip the old tape completely, clean with isopropyl alcohol, and add mechanical fasteners at that location instead of relying on adhesive a second time.
- Water intrusion behind a lip that’s pulling away at the seams means it’s time to reseal with silicone and check whether additional fasteners are needed to close the gap for good.
Front Lip Maintenance and Inspection Schedule
Check your hardware after the first 25 to 50 miles of driving, since that’s when vibration reveals any fastener that didn’t seat properly. After that, inspect monthly for the first three months, then move to a seasonal check.
Carbon fiber and fiberglass both benefit from a UV-protectant wax or ceramic coating to prevent clear coat yellowing over time. If you’re running an aggressive splitter in winter climates, consider removing it before heavy snow season, since curb strikes on unplowed streets are the number one cause of cracked lips. Re-torque hardware any time you scrape a curb or hit a pothole hard enough to notice, and always inspect after any parking lot contact, even minor.
How Underground Dynamics Approaches Fitment
Underground Dynamics builds its catalog around chassis-specific, direct-fit parts for a reason: predictable clearance and sensor compatibility beat guesswork every time. A lip engineered for your exact bumper means the mounting points already account for factory sensor locations, tow hook covers, and suspension geometry.
Our recommended hardware profile leans on OEM-style shoulder bolts and U-nuts or backed rivnuts, torqued to the ranges outlined above, because that combination has proven itself across the platforms our customers actually build. If you’re working on a Miata, check the Miata-specific lip guide for platform notes, or the BRZ lip guide if you’re running that chassis.
Author Ismael draws on Underground Dynamics’ fitment testing process when developing these installation guides, cross-referencing hardware behavior across chassis to flag where generic advice breaks down for specific vehicles.
What This Guide Actually Recommends
The conventional wisdom treats front lip installation like a tape-and-drill toss-up, as if the choice comes down to preference. It doesn’t. If you’re driving the car, mechanical fasteners win, full stop, and adhesive’s role is supplemental sealing and vibration dampening, not primary structural support.
Where most guides fall short is clearance checking. They’ll walk you through drilling and torque specs in detail, then wave at “check for clearance” in a single sentence. That’s backwards. The clearance and sensor check should happen before a single hole gets drilled, because a misplaced hole through a radar sensor housing costs far more to fix than a slightly slower install.
Prioritize chassis-specific fitment data over universal kits if your budget allows it. Universal lips can work, but they shift the burden of engineering onto you, the person with a drill and a Saturday afternoon. That’s a fair trade for the price difference, as long as you respect the template-and-measure process instead of rushing to the drill.
*— Ismael
Sources
- The definitive guide to installing a front lip on your car — How To Information
- Front Splitter Installation Guide
- Golden Era Parts — For Honda & Acura front lip hardware kit
FAQ
How Much Does It Cost to Get a Front Lip Installed?
Hardware for a bolt-on install typically includes shoulder bolts, U-nuts, or rivnuts, adding to the cost on top of the lip itself. Shop labor for installation varies widely by region and vehicle, but a straightforward bolt-on job often falls in a similar range to the DIY hardware cost, while custom trimming or bodywork adds significantly more.
What Is the Best Way to Install a Front Lip on My Car?
Test-fit and center the lip first, then drill and fasten with OEM-style shoulder bolts and U-nuts or rivnuts, using adhesive tape as a supplemental seal rather than the primary mount. This approach handles road vibration and cornering loads far better than tape alone.
Can You Install a Front Lip Without Drilling?
You can mount a lip temporarily with 3M VHB tape or butyl tape for show use, but tape-only installs generally aren’t durable enough for regular driving or track use. Most performance lips in fiberglass or carbon fiber need mechanical fasteners to hold up long-term.
How Long Does a Front Lip Installation Take?
A straightforward bolt-on install with a direct-fit kit typically takes 30 to 90 minutes. Universal kits requiring trimming, templating, or bumper removal can take several hours, especially on a first attempt.