FREE SHIPPING ON ORDERS OVER $150
Cart
0

Dialing in coilover alignment settings is the process of precisely adjusting camber, caster, and toe to optimize vehicle handling and tire performance after installing coilovers. Suspension geometry, the industry term for this discipline, shifts every time you change ride height. Skip the alignment step and you are not just leaving performance on the table. You are actively destroying your tires and compromising safety. This guide gives you the full picture: what each parameter does, how to adjust it, and how to keep it dialed in over time.
What are the key alignment parameters when dialing in coilovers?
Camber, caster, and toe are the three pillars of suspension geometry. Each one affects how your car handles, how your tires wear, and how the car feels at speed. Understanding all three before touching a wrench is non-negotiable.
Camber is the inward or outward tilt of the tire when viewed from the front. Negative camber tilts the top of the tire inward toward the car. Street-focused baselines run from -1.0° to -1.5° front and -1.0° to -2.0° rear. Those numbers give you cornering grip without destroying the inside edge of your tires on daily drives.
- Front camber (-1.0° to -1.5°): improves cornering contact patch and lateral grip
- Rear camber (-1.0° to -2.0°): adds stability through corners without excessive inside wear
- Track-only setups can push further negative, but daily drivers pay for it in tire life
Caster is the angle of the steering axis when viewed from the side. More positive caster improves straight-line stability and steering self-centering. It also increases negative camber dynamically in turns, which means you get better mid-corner grip without adding static camber and the tire wear that comes with it.
Toe is the direction your tires point relative to the car’s centerline. Toe-in adds straight-line stability, which is why most street setups use zero or slight toe-in. Toe-out sharpens turn-in response but makes the car nervous at highway speeds. Street builds stay near zero. Track builds experiment with mild toe-out up front for quicker rotation.

Pro Tip: When you lower a car with coilovers, camber and toe both shift. A car that was aligned at stock height is no longer aligned at your new ride height. Always re-measure after any height change.
What tools and prep steps do you need before adjusting coilover settings?
Getting the setup right before you start measuring saves you hours of chasing bad numbers. Baseline conditions must be locked in before any alignment work begins. That means tires inflated to spec, all suspension bolts torqued to factory values, and no worn bushings or ball joints in the system. A bad bushing makes every measurement meaningless.
Here is the minimum tool list for a proper alignment session:
- Alignment rack or string alignment kit: a professional rack is most accurate; a string setup works for DIY with patience
- Camber gauge: digital gauges read to 0.1° and cost less than one alignment appointment
- Torque wrench: for confirming all suspension hardware is at spec before you start
- Jack stands and a level surface: never measure alignment on an uneven floor
- Tape measure and chalk: useful for string alignment reference lines
| Tool | Purpose | DIY Viable? |
|---|---|---|
| Alignment rack | Full geometry measurement | No (shop only) |
| Digital camber gauge | Measure camber angle | Yes |
| String alignment kit | Measure toe at home | Yes |
| Torque wrench | Confirm hardware torque | Yes |
| Jack stands | Safe, level vehicle support | Yes |
Set your ride height first and let the suspension settle. Drive the car a short distance, bounce each corner a few times, then re-measure height before locking anything in. Suspension that has not settled will give you false readings.
Pro Tip: Set damping to the midrange position before alignment. Starting damping at midrange gives you a neutral baseline so the suspension behaves predictably during measurement.
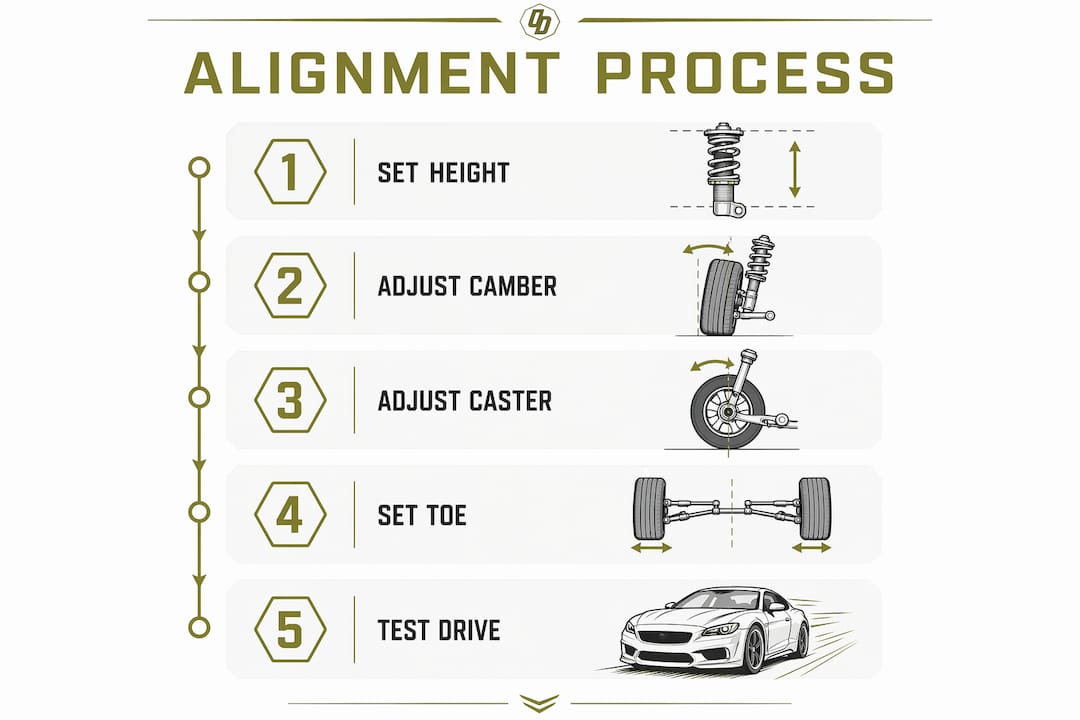
How to step-by-step dial in coilover alignment for street and track
This is where the work happens. Follow this sequence and you will have a repeatable system that produces real results.
-
Confirm final ride height. Measure corner to corner. All four corners should be within a few millimeters of your target. Recheck after bouncing the suspension.
-
Measure baseline camber. Use your camber gauge on all four corners before touching any adjustment. Write the numbers down. You need a reference point before making changes.
-
Adjust camber one corner at a time. Work front axle first, then rear. Target your chosen range based on use: street builds stay in the -1.0° to -1.5° front range; track builds can go further. Make adjustments in small increments, 1–2 clicks or minor perch height changes, then re-measure before moving on.
-
Set caster. Caster is less frequently adjustable on stock geometry cars, but many coilover setups include adjustable upper mounts or camber plates that affect caster. Add positive caster for better highway feel and self-centering. Reduce it only if you need lighter steering for a dedicated track car.
-
Dial in toe. Set front toe to zero or slight toe-in for street. If you want sharper turn-in for track use, experiment with mild toe-out, but test it at speed before committing. Rear toe-in adds stability and is the safer default for most builds.
-
Road test and log. Drive the car through a range of conditions: highway, tight corners, braking zones. Note any pulling, vagueness, or unusual tire scrub. Come back and make one correction at a time.
-
Check tire wear after 200–300 miles. Uneven wear across the tread face tells you more than any gauge. Inside edge wear means too much negative camber. Outside edge wear means not enough. Feathering across the tread means toe is off.
Pro Tip: Keep a notebook or phone note with every setting you change and the result. Alignment tuning without a log is just guessing. A repeatable system beats a one-time lucky setup every time.
What common mistakes should you avoid when dialing in coilover alignment settings?
Most alignment problems come from a short list of repeatable errors. Knowing them in advance keeps you from learning the hard way.
- Skipping alignment after a ride height change. Alignment must happen immediately after any suspension or height adjustment. No exceptions.
- Adjusting multiple settings at once. Change one parameter, test it, then move to the next. Changing camber, toe, and damping simultaneously makes it impossible to know what caused a handling change.
- Running extreme negative camber on a street car. Excessive negative camber accelerates inside tire wear and reduces straight-line braking performance. The aesthetic is not worth the cost.
- Ignoring caster when lowering. Lowering a car changes caster angle. Builders who only adjust camber and toe miss a key variable that affects steering feel.
- Skipping the road test. Numbers on paper mean nothing until the car moves. Always validate alignment settings with real driving before calling the setup done.
- Never rechecking after impacts. Hitting a pothole or curb shifts alignment. A single hard impact can undo a careful setup.
Alignment is not a one-time task. It is an ongoing part of suspension maintenance, especially on a lowered or modified car that sees varied road conditions.
How to verify and maintain optimal coilover alignment over time
A well-aligned car does not stay that way forever. Roads, impacts, and component wear all shift geometry over time. Staying on top of it is part of owning a properly built car.
Check alignment every 6,000–10,000 miles or immediately after hitting a curb or pothole. That interval is not arbitrary. It accounts for normal road stress on suspension components and gives you a window to catch drift before it costs you tires.
Watch for these signs that alignment has shifted:
- The car pulls to one side on a flat, straight road
- Steering wheel is off-center at straight-ahead
- Uneven tire wear across the front or rear axle
- Vague or inconsistent steering response through corners
- Increased road noise from the front tires
| Warning Sign | Likely Cause | Action |
|---|---|---|
| Car pulls left or right | Toe or camber imbalance | Full alignment check |
| Inside tire wear | Excessive negative camber | Reduce camber, recheck |
| Outside tire wear | Insufficient camber | Add negative camber |
| Feathered tread | Toe out of spec | Adjust toe, retest |
| Off-center steering wheel | Toe or caster imbalance | Professional alignment |
Seasonal changes matter too. Temperature swings affect tire pressure, which affects the effective contact patch and how alignment reads in practice. Check tire pressure every time you check alignment. They are connected.
Key Takeaways
Dialing in coilover alignment settings requires adjusting camber, caster, and toe in sequence after setting ride height, using one change at a time and validating each with a road test.
| Point | Details |
|---|---|
| Set ride height first | Alignment measurements are only valid at your final, settled ride height. |
| Know your baselines | Street builds target -1.0° to -1.5° front camber and zero to slight toe-in. |
| One change at a time | Adjust a single parameter, test it, then move to the next to isolate effects. |
| Check after every impact | A pothole or curb strike can shift alignment enough to cause tire wear. |
| Log every adjustment | A written record of settings and results makes future tuning faster and more reliable. |
What I have learned from years of chasing the right alignment setup
The biggest mistake I see builders make is treating alignment as the last checkbox before driving, not as a tuning tool in its own right. You can spend real money on quality coilovers and still have a car that handles worse than stock if the geometry is wrong. I have seen it happen more times than I can count.
The insight that changed how I approach this: alignment tuning is equally crucial as the hardware itself. A modest coilover kit with a dialed-in alignment will outperform an expensive kit with a lazy setup. Every time.
What I tell builders who are new to this is to be patient with small changes. The temptation to slam the car to -3° camber and call it done is real. But the cars that actually perform well on track and still survive daily driving are the ones where someone spent time on incremental adjustments and actually drove the car between changes. That seat time is irreplaceable. You cannot read your way to a good setup. You have to feel it, log it, and refine it.
The other thing worth saying plainly: caster is the most overlooked parameter in the enthusiast world. Builders obsess over camber numbers and ignore caster entirely. Adding positive caster costs you nothing in tire wear and gives you a car that tracks straight and self-centers properly. If your coilover kit includes adjustable upper mounts, use them. Check out the build projects at Undergrounddynamics for real-world examples of how geometry choices play out on actual builds.
Alignment is not glamorous. Nobody posts about it on forums the way they post about new wheels or body kits. But it is the difference between a car that is fast and one that just looks fast.
— Ismael
Suspension parts worth pairing with your alignment work
Getting your geometry right is only half the equation. The hardware underneath has to be up to the task.

Undergrounddynamics carries suspension components built for enthusiasts who take setup seriously. The catalog includes full coilover kits with the adjustability you need to actually dial in camber and ride height, not just bolt-on and hope for the best. Every product listing includes real fitment detail and specs so you know what you are getting before it ships. Whether you are building a street car that doubles as a weekend track weapon or a dedicated drift setup, the parts are there. No guesswork, no vague fitment claims.
FAQ
What is the first step when dialing in coilover alignment?
Set your final ride height and let the suspension settle before measuring anything. Alignment numbers taken at the wrong ride height are useless.
How often should you check alignment on a lowered car?
Check alignment every 6,000–10,000 miles or immediately after any hard impact with a curb or pothole.
What camber setting is best for street driving?
Street builds perform well at -1.0° to -1.5° front and -1.0° to -2.0° rear. Going beyond those ranges accelerates inside tire wear without meaningful grip gains on public roads.
Does toe-in or toe-out work better for track use?
Mild front toe-out sharpens turn-in response for track use, but toe-out at high speeds makes the car nervous. Test carefully and only adjust in small increments.
Why does alignment change after installing coilovers?
Changing ride height shifts the suspension geometry angles. Camber and toe both move when the car sits lower, which is why alignment must be performed immediately after any coilover installation or height adjustment.