FREE SHIPPING ON ORDERS OVER $150

Cart
0

Coilovers are a suspension system that combines a coil spring and shock absorber into a single adjustable unit, giving you direct control over ride height, spring preload, and damping. A proper coilovers for Honda Civic setup lets you dial in handling that matches your driving style, whether that’s daily street use or weekend track days. High-performance Civic builds typically run linear-rate springs at around 10kg/mm front and 8kg/mm rear for consistent, predictable behavior. Get the setup wrong, and you’re dealing with tire rub, vague steering, and a ride that beats you up. Get it right, and the Civic becomes a genuinely sharp, rewarding car to drive.
What tools and prep do you need before starting your coilover setup?
Preparation is the difference between a clean install and a frustrating afternoon of stripped bolts and guesswork. Gather every tool before you lift the car, not halfway through the job.
Tools you need:
- Spring compressor (rated for your spring rates)
- Torque wrench (capable of 80–120 ft-lbs for suspension fasteners)
- Digital calipers or a tape measure for ride height checks
- Floor jack and jack stands rated for your car’s weight
- Spanner wrench for adjusting threaded collars
- Penetrating oil for corroded OEM hardware
- Alignment gauge or string line for a quick camber check
A flat, level surface is non-negotiable. Concrete garage floors work. Driveways with slopes introduce measurement errors that will haunt your alignment later. Always use jack stands. Never work under a car supported only by a floor jack.
Pro Tip: Let new coilovers settle for several days of normal driving before locking collars and taking final ride height measurements. Springs and bushings need time to compress into their natural position, and your first measurements will be off if you skip this step.
Safety gear matters too. Compressed springs store serious energy. A spring compressor failure can cause injury. Use a quality tool, not a budget harbor freight unit you found at a swap meet.
How do you set initial ride height and spring preload on Honda Civic coilovers?
Ride height and preload are your starting point. Every other adjustment builds on getting these two right first.
Step 1: Measure your baseline
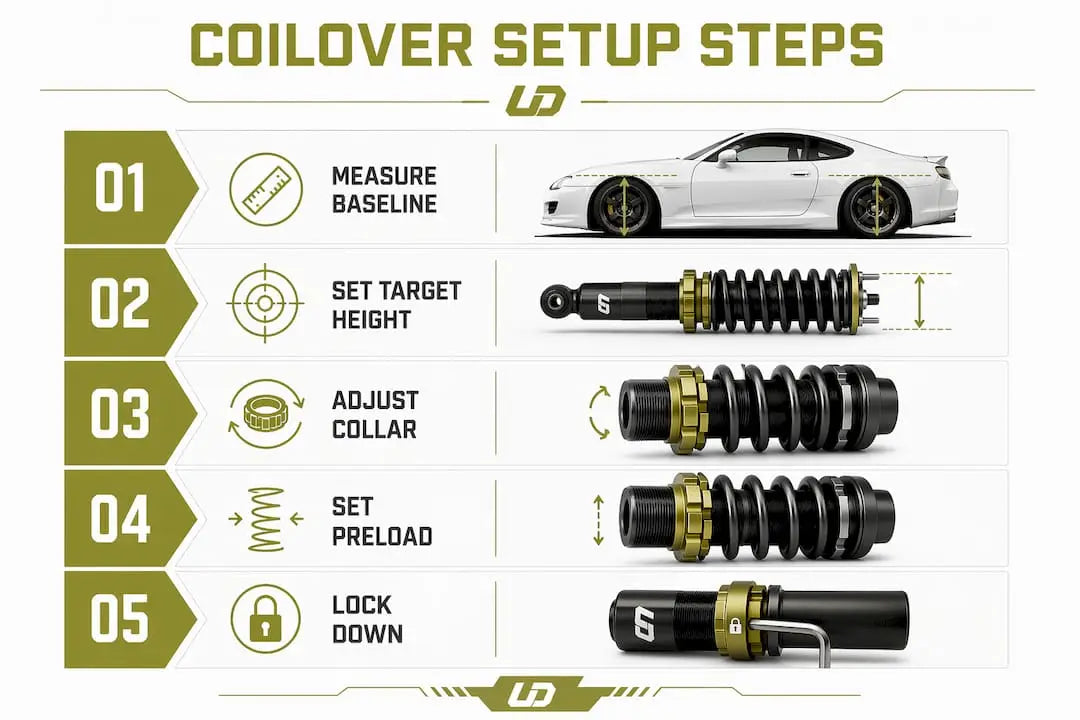
Measure from wheel center to fender arch, not from the ground to the fender. Ground measurements vary with tire pressure and wear. Wheel center to fender gives you a consistent, repeatable number. Record all four corners before touching anything.
Step 2: Set your target height
Most street-focused Civic builds drop 1.0–1.5 inches from stock. Track builds may go lower, but anything beyond 2 inches on a stock subframe risks geometry problems. Decide your target before you start turning collars.
Step 3: Adjust the threaded collar
The lower threaded collar on the coilover body controls ride height. Turn it clockwise to raise the car, counterclockwise to lower it. Make adjustments in half-turn increments. Recheck your wheel-center-to-fender measurement after each adjustment.

Step 4: Set spring preload
Preload keeps the spring seated against the perch without adding stiffness to the ride. Zero preload means the spring can rattle loose. Too much preload adds unnecessary harshness. The correct setting is just enough tension to keep the spring from moving when the suspension is at full droop. Snug the upper perch until you feel light resistance, then stop.
Step 5: Lock everything down
Tighten the lock ring against the threaded collar with your spanner wrench. A loose lock ring lets the collar walk over time, and your ride height will change without warning.
Pro Tip: Adjust one variable at a time. Set ride height first, drive the car, then revisit preload. Changing height and preload simultaneously makes it impossible to know which adjustment caused a change in feel.
Premium coilovers like the Skunk2 Racing Pro-ST for the 06–11 Civic Si include 12-way adjustable damping and pillow-ball camber plates, which give you a wider adjustment window than entry-level units. More adjustment range means more room to fine-tune, but it also means more variables to manage.
How do you adjust damping for street and track performance?
Damping controls how fast your springs compress and rebound. Shock absorbers manage spring movement. Springs carry the weight. Without proper damping, springs bounce freely and the car becomes unpredictable.
Step 1: Start in the middle
Set your damping adjusters to the midpoint of their range. On a 12-way unit, that’s position 6. This gives you a neutral baseline to work from.
Step 2: Drive on a consistent road
Pick a road you know well. Potholes, expansion joints, and rough patches you recognize let you feel changes clearly. Drive the same stretch before and after every adjustment.
Step 3: Identify what you’re feeling
- Too soft: The car bounces after bumps and feels floaty in corners.
- Too stiff: The car crashes over small bumps and skips over rough pavement.
- Correct: The car settles quickly after a bump and stays planted in corners.
Step 4: Make one click at a time
Move the adjuster one position stiffer or softer. Drive again. One click at a time is not slow. It’s the only way to know what each position actually does.
Effective coilover setup achieves predictable, controlled handling and avoids harshness or excessive bounce. Running full stiff damping on a street car is a common mistake. Maximum stiffness is designed for smooth track surfaces. On public roads, it transmits every crack and seam directly to the chassis, which wears out components faster and makes the car harder to control. A suspension tuning checklist helps you track each change systematically.
For track days, stiffen the damping two to three clicks from your street setting before you go out. Soften it back for the drive home. Keeping a small notebook in the glovebox to log your settings takes 30 seconds and saves hours of re-tuning.
What are the most common mistakes when setting up Civic coilovers?
Even experienced builders make these errors. Knowing them in advance saves you time, money, and a set of tires.
- Over-lowering the car. Excessive lowering causes tire rubbing, reduced suspension travel, and harsher impacts over bumps. A Civic slammed to the bump stops is not a performance car. It’s a liability.
- Skipping a professional alignment. Coilovers change your suspension geometry. Camber, toe, and caster all shift when you change ride height. Driving on a misaligned setup causes rapid, uneven tire wear and unstable steering. Get an alignment every time you change ride height by more than half an inch.
- Leaving lock rings loose. A collar that isn’t locked will rotate under vibration. Your ride height will drift, and you won’t know why the car feels different week to week.
- Ignoring worn suspension components. New coilovers on worn control arm bushings, tie rod ends, or sway bar links will not perform as expected. The worn parts introduce slop that masks what the coilovers are actually doing. Inspect and replace worn components before installation.
- Not checking clearance after lowering. After your first drive, turn the wheel lock to lock and check for tire contact with the fender liner, control arms, and brake lines. Do this at full droop too, with the wheel hanging free.
Pro Tip: After installation, check your coilover alignment settings within the first 500 miles. Suspension components settle, and small geometry shifts happen early. A follow-up alignment check protects your tire investment.
Knowing when your shocks are no longer performing correctly matters just as much as the initial setup. Watching for signs of shock wear helps you catch problems before they affect handling or safety.
Key Takeaways
A proper Honda Civic coilover setup requires sequential adjustment of ride height, spring preload, and damping, with a professional alignment after every significant height change.
| Point | Details |
|---|---|
| Measure wheel center to fender | This method gives consistent ride height readings regardless of tire condition. |
| Adjust one variable at a time | Changing multiple settings at once makes it impossible to identify what improved or worsened. |
| Start damping at midrange | Middle settings give a neutral baseline before making incremental changes. |
| Lock all collars before driving | Loose lock rings allow ride height to drift and create unpredictable handling. |
| Get an alignment after setup | Coilovers shift camber and toe; skipping alignment causes rapid tire wear and unstable steering. |
What I’ve learned from watching builders rush the setup process
Here’s the honest truth: most coilover setups I’ve seen go wrong happen in the first hour. Someone installs the kit, slams the car as low as it will go, and drives away without measuring anything. Two weeks later they’re asking why the front tires are cupping and the car pulls left.
The builders who get it right treat the first setup as a starting point, not a finished product. They set a conservative ride height, drive for a week, then make small adjustments based on what they actually feel. That iterative approach sounds slow. It’s actually faster than chasing problems caused by doing too much at once.
The other thing I’d push back on is the idea that stiffer always means better. A Civic with handling tuned for your driving style and actual road conditions will be faster and more enjoyable than one set up for a track you visit twice a year. Comfort and performance are not opposites. A car that doesn’t beat you up lets you drive it harder for longer.
Set a clear goal before you touch a spanner wrench. Street comfort, weekend track use, or autocross all call for different spring rates and damping settings. Knowing your goal keeps every adjustment purposeful.
— Ismael
Undergrounddynamics suspension options for your Honda Civic build

Undergrounddynamics carries a full range of coilovers and suspension upgrades built for Honda Civic enthusiasts who want real fitment specs and technical detail before they buy. Every product listing includes spring rates, damping adjustment range, and compatibility data so you know exactly what you’re getting. The catalog covers entry-level adjustable kits for daily drivers and higher-spec units for track-focused builds. If you’re building a Civic that needs to perform on both the street and the circuit, the Undergrounddynamics performance parts catalog is worth a look before you commit to a setup.
FAQ
What spring rates work best for a Honda Civic on coilovers?
High-performance Honda Civic setups typically use linear-rate springs at around 10kg/mm front and 8kg/mm rear. These rates balance street compliance with track-capable stiffness.
How do I measure ride height correctly on a Civic?
Measure from the wheel center to the fender arch, not from the ground. Wheel center measurement eliminates errors caused by tire pressure and tread depth variation.
Do I need an alignment after installing coilovers on a Honda Civic?
Yes, every time. Coilovers change your suspension geometry, and even a small drop in ride height shifts camber and toe enough to cause uneven tire wear and unstable steering.
How long should I wait before making final coilover adjustments?
Drive for several days after installation before locking collars and finalizing ride height. Springs and bushings settle under load, and early measurements will not reflect the car’s true resting position.
Can I set up coilovers for both street and track use on a Civic?
Yes, but you need to adjust damping between uses. Start two to three clicks stiffer than your street setting for track days, then return to your street baseline for daily driving. Keeping a log of your settings makes this process repeatable.